a controversial project? you decide. . .

March 11th, 2012

There are typically two approaches that people take when restoring a Victorian house. Approach one is a total renovation-taking a Victorian and turning it into a completely modern house with the exterior shell of a Victorian. Walls come down, walk-in closets and lacquer kitchen cabinets go up. The second approach is to rehab the house–maintain the architectural quirks and details while completing all the necessary structural and cosmetic updates. Of course, in either of these approaches people can get a little extreme in their approach. The renovators may knock down the entire building and simply leave the facade–which leads me to wonder why they bothered starting with a Victorian in the first place. The rehaber may retain (or introduce) details that were appropriately discarded decades ago (really ugly wallpaper is my favorite example).

Here at mad maison we’ve mostly taken approach number two-rehab. We haven’t knocked down any walls (though we’ve taken down some doors), and we didn’t paint any walls chartreuse green. There is one project we completed that the traditional rehabers will probably object to. Strongly.

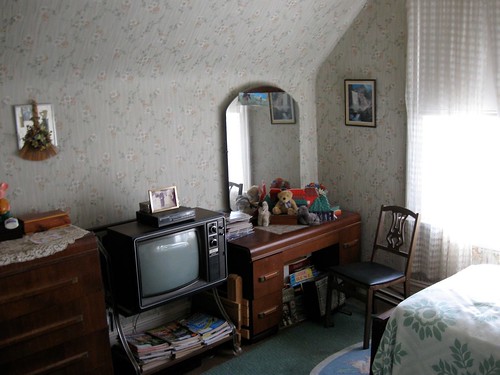
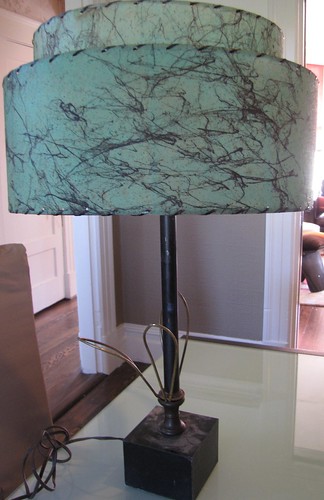
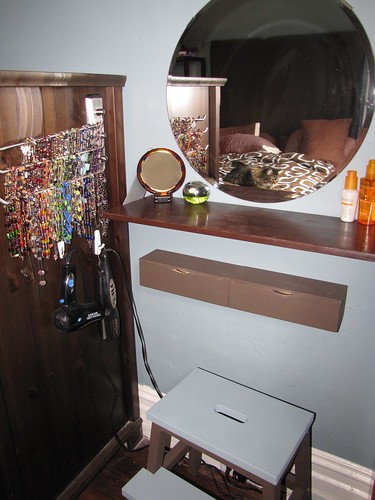
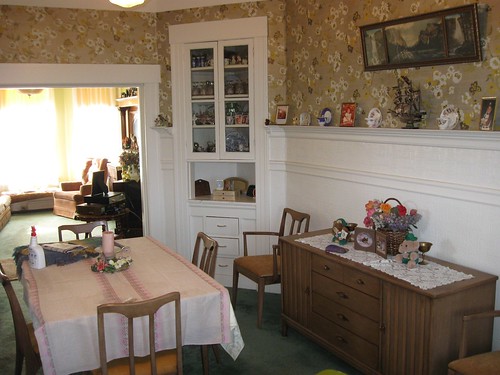
Our living room is not particularly large. Typical of a Victorian, it’s somewhat narrow (it’s under 12 feet wide). Our dining room is actually a little larger than the living room. When mad moved into the house, we realized that the original mantel for the decorative fireplace took up a huge amount of space–and it’s larger-than-life presence completely dominated the room. It was the definition of a “focal point,” only we weren’t happy with was it was pointing to. The tone of the wood was something akin to “Florida orange” and the design, with it’s oval mirror, didn’t allow us to display art or anything personal. It was old, but it didn’t feel antique. Dear reader, you can judge for yourself:

fireplace_1

The original mantel. Note the height, depth, and color. Ignore the ghost in the mirror.

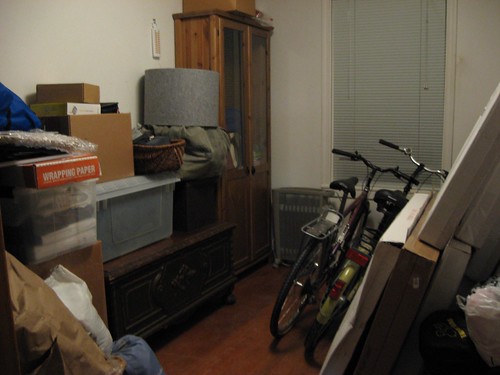
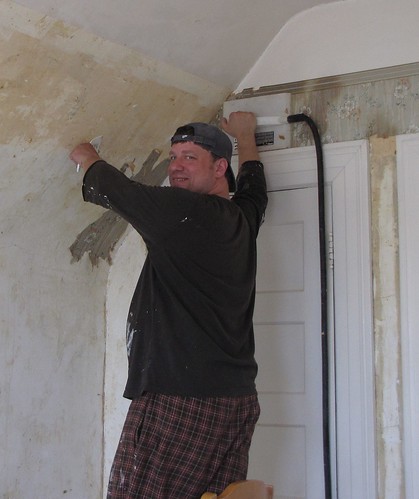
After considering our options (including painting, restaining, and taking out the mirror), mad made the controversial decision to remove the mantel. Yes, remove it. It actually came down in almost one whole piece–and we quickly learned it was hollow. Which made us think maybe it wasn’t that “precious” a detail as we might have originally thought. At that point we didn’t care either way, because immediately, the room opened up and felt better. Once the mantel was down, we were left with a fireplace and tile surround that were looking a little naked. So mad enlisted my brother to build a simple mantel. Here you can see the fireplace with the wood cleats he screwed into the wall:

fireplace_2

naked mantel, about to be dressed. and please, don't ask what that stain is on the tile (we didn't).

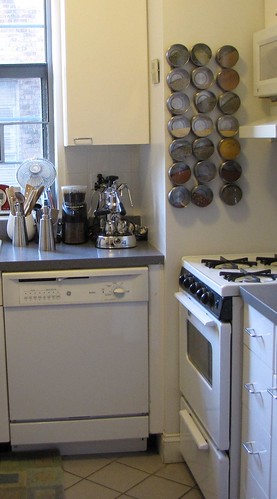
After installing the cleats, my brother cut some standard pieces of moulding, and a top piece for the shelf. After the mantel was built, we realized that there was a gap in the baseboard because our new mantel was so much sleaker than the original one. So we liberated some small pieces of baseboard from the deepest recesses of our bedroom closet to fill in the gaps. Behold, here is the new fireplace, with a new mantel and a beautiful expanse of wall above it:

fireplace_3

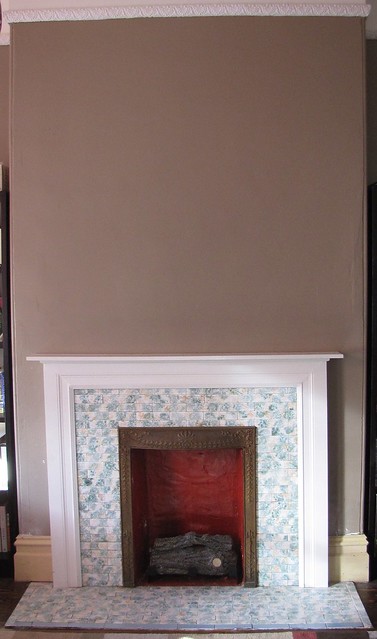
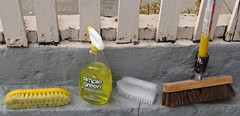
If you’re curious, we removed that icky stain with a natural degreaser that worked like magic, SafeChoice Super Clean. Of course, the fireplace still wasn’t perfect in my eyes. While the red firebox, brassy metal frame, and green/beige mottled tile may appeal to some, it just wasn’t our style. We seriously considered replacing all the tile, but also realized that would be a more appropriate project years from now when the rest of the house is complete. After extensive consideration and research (and a motivational post on yhl), we decided to paint the tile. Yes, paint the tile. Even though it’s a decorative fireplace we do use it with gel-fuel, so I painted the firebox and metal surround with a high-heat roll-on paint. For the tile, I sanded them lightly to “rough up” the surface, primed them, and painted them with two light and even coats of the same white semi-gloss paint we’ve used on all the woodwork in the house. Finally, I applied two light coats of Safecoat Acrylacq. It’s been a few months and the tile has done fine with and still looks fresh. We hope you agree:

fireplace_4

mad maison's "new" fireplace

I know there are people who will disapprove. They’ll suggest we should have embraced the old mantel and (what was for us) the nausea-inducing tile. One of my regular resources, This Old House would call us reckless. But this is our maison, after all.  All the work we’ve done has reinforced that you have to make your house work for you. We spend time in our living room every day. Our fireplace has gone from something we hated, to something we felt ok about, to something we love to look at and can’t wait to decorate with holiday lights in December. If that makes us mad, so be it.

quiet blog = noisy life

February 1st, 2012

How unfortunate–a quick post in September teasing about a reveal and then nothing for months. There are reasons good and bad, big and small for our absence. The biggest reason for the delays is because we’ve bought the house that we’ve been living in for over two years. Given that the house was already in our family, our original plan was to live in the house without purchasing it. After rehabbing almost every room inside the house, we starting thinking about and planning the major work that needs to be completed on the outside. As we started to add up the costs required, we all realized that mad purchasing the house made the most sense. Buying any property in San Francisco is a time-consuming process, even (or perhaps especially) for an in-family purchase. It took us over three months to complete the process–but we’re happy to report that the house is officially ours (and the bank’s, of course). Once the process began in earnest, I didn’t want to tempt the fates with a blog post here (I’m a little superstitious). Since our last post, we’ve actually been working on a few projects that we’ll report here soon, including:
1. Rehabbing our front hallway.
2. Refreshing our living room fireplace.
3. Rewiring one of our ceiling lights.

The biggest project is the one we’re still immersed in–at the end of December we started to rehab our kitchen. We’re far from done, but we’ve accomplished enough where we can see the light at the end of the tunnel. The kitchen project also means the whole house is in a bit of chaos–throwing a bit of a wrench in the “reveals” of our other projects. But you’ll hear (and see more) soon.

2012 is also big for mad maison because we’ll start the process of improving the exterior of our little maison. It’s been decades since the house was painted–and it’s in need of a thorough restoration and refresh. In addition, we still have a kitchen to finish and a bathroom to rehab. There will be plenty more to see here, I promise.

close to another reveal. . .

September 12th, 2011

Tonight, after working a full day and eating dinner I sat on the couch and read a little. This is not monumental, except that I had zero guilt while relaxing. I didn’t feel the pull of wallpaper to be removed, plaster to be repaired, or walls to be painted. That’s because mad is currently basking in the glow of another completed (though not fully staged) space in our house. We have completed the rehab of our hallway. One would think that a hallway is easy. After all, you don’t hang out in your hallway, and it typically contains little furniture. Alas, we have learned that is not always the case. This space represented a major milestone. Unfortunately, I had started to remove some of the wallpaper two years ago, before we settled on our “one room at a time” approach. So every time we stepped in the house (or anyone else did) it was very clear this was a home in transition. To know that we’re one light fixture and a few finishing touches away from making a positive first impression to anyone who enters our home is a great feeling. We’ll share more photos and details soon, but for now, we’re going to relax a little longer.

fool me once. . .

July 12th, 2011

When you rehab every room in a house there are always small, lingering tasks. They don’t prevent you from using the room, but you know the room isn’t quite ready for prime time (or a blog post). Here at mad maison we have more than a few. Sometimes, completing those tasks can be more fulfilling than all the other work you put into a room. Recent examples are the ceiling fixtures in both our bedroom and mike’s office. You may be surprised to learn that mad wanted to replace the identical light fixtures in the two bedrooms:

Mike's Ceiling Fixture, before

original bedroom fixtures

Perhaps you recall from a much earlier mad maison post, we were almost undone by the wiring in the living and dining rooms. In the bedrooms, we delayed replacing the lights until we found fixtures we loved and a better method. Once we found the fixture for mike’s office from Room & Board, I knew I would use a similar simple pendant/drum shade fixture in our bedroom. The night we purchased the light, as I was laying in bed looking at the old fixture, I remembered something Bob (the Room & Board salesperson) said about the wiring: “you could easily replace the housing unit for very little money with one that’s suitable for your house.” You see, the tops of the living room, dining room, and both bedroom lights all looked like this:

Dining Room Light, before

original dining room fixture

As you can see, there is a canopy (that sits against the ceiling), a rod that screws into the hickey (I swear, that‘s the name), a chain attached to the rod, and then the rest of the fixture. As I looked at the fixture still hanging in our bedroom, I realized I could probably cut the chain, reuse the rod and the canopy, spray-paint them (someone had painted the top of the fixture in the dining room), and then string our new pendants through them and install them quickly and easily. So that’s exactly what we did. I’m thrilled with the results. The pendants are very secure (especially since they’re much lighter than the earlier chandeliers) and I prefer the look of the white canopy on white ceiling to the chrome on white we currently have in the dining room and living room. And, the design works better with this 103 year-old house. See for yourself:

Mike's office Ceiling LIght

new ceiling fixture in mike's office

Bedroom Ceiling Light

new bedroom ceiling fixture

In fact, when we’re done with everything else in the house, and I’m able to find suitable canopies and rods for the living room and dining room, I might even rewire our current pendants in those two rooms. Of course, that won’t happen for quite some time. We have many other small tasks (like our kitchen, bathroom, and hallway) to finish first. Perhaps most satisfying of all is the realization  that we’re actually getting smarter and learning from our mistakes. Our house may be able to fool us once, but not twice.

an external experiment

July 10th, 2011

It isn’t an accident that mad maison hasn’t shared photos of the exterior of the house. It’s been a long time since the house was painted–and the last paint job was not up to our standards. Right now, it’s still a little “crack-house” chic. We’ve been focused on the inside of the house (and we’ve had a few projects cooking that we’ll share in upcoming posts) and we knew the outside would be quite a thing. Our plan is to have the exterior repaired and repainted (hopefully) in the next twelve months. In the meanwhile, we conducted a small experiment on the exterior and we’re excited to share the results with our loyal readers. In addition to the old paint job, the exterior of mad maison sports a treatment commonly referred to as schmutz. There is visible dirt on the exterior, which complements the old paint job quite nicely. While we’re not ready to hire painters, we thought we could try removing the worst of the schmutz. We wanted to try washing part of the house. We started with a very specific area, the garage doors, to measure our results. We didn’t want to do any full-blown power washing, for fear that we would remove the old paint from the house (or, heaven forbid, knock the whole structure down). Of course, this being mad maison, additional work was required to complete the task at hand. There is a water spigot on the outside of the house:

le spigot

You’ll notice that there is no faucet to go with the spigot. Task one, therefore, was to find a faucet that we could install. A couple of trips to the hardware store led us to discover the four-way stem key:

four way stem key

four-way stem key

The stem key works as a “removable” faucet, which means no scurrilous individuals can steal our water while we’re not looking (my grandfather would be so pleased):

four way stem key

stem key in position

Once we found the stem key, we also found a “faux” power washer to fit on the end of a hose. This extends the reach of the hose spray without producing too much paint-stripping psi:

power washer

"power" washer

Finally, we assembled our cleaning/scrubbing supplies:
cleaning tools

While the house still looks like it needs a paint job, we were pleased that we successfully removed the loose schmutz, and feel it is a temporary improvement until we’re able to get the professionals in here. Here’s the before and after:

garage door, dirty

garage door, dirty

garage door, scrubbed

garage door, cleaner

We think the improvement is even more apparent in the close-ups:

dirty garage door close up

dirty close up

scrubbed garage door close up

clean close up

Inch by (sometimes frustratingly small) inch we’re getting this mad maison to where it should be.

stretching out. . .

May 15th, 2011

Last weekend mike and i were wrapped up in mother’s day festivities–and this week we were felled by a nasty case of viral gastroenteritis. This weekend we celebrated our renewed health by putting together a new desk for mike’s office. As a reminder, here’s what the old desk looked like:
2nd bedroom, post rehab

While the “ladder” style desk worked well in Queens (in our tiny second bedroom), the style doesn’t work in our current bedrooms due to the hanging eaves. In addition, we decided to get a desk that works better in the larger space. After a bit of research we went with the expedit bookcase and desk. I’m happy with how it fills the room–and mike’s happy that he can now put his scanner next to his computer rather than on the shelf above it:

Of course, putting together ikea pieces comes with certain frustrations. Thankfully, Mike only had to position himself like this:
IMG_0301
for two hex screws positioned under the desk. It wouldn’t be an ikea piece without the use of an allen key and cam screws.

earth day, mad style

April 23rd, 2011

We haven’t spent much time talking about the exterior of our humble maison. Honestly, it needs a lot of work–and it’s the sort of work that we can’t do ourselves. Despite this, we were inspired by our neighbors (who did a little clean up work on a major street near mad maison) to do a little front yard clean up. We’re not quite sure what our long term goal is for the small front yard. We’re pretty sure we want to get rid of the strange vegetation/ground cover that is there, but we don’t yet know what we would replace it with. Here’s what it looked like before we began:

front yard, before
You’ll notice the broken gate, as well as the horror-movie-creature-like tendrils that were starting to reach out toward the sidewalk. The current state is not exactly gorgeous, but it is more under control:

front yard, after

Pulling up every weed is challenging because they get entangled with the bushes that are planted. Overall, we’re happy with the progress and more motivated to maintain it on an ongoing basis.

Mike did almost all the hard work on behalf of mad:
mike

Wishing all our faithful readers a happy earth day!

a day in the life. . .

April 8th, 2011

One of my favorite things about the blog mi piace kate are Kate’s adorable cats. Not only are her cats cute, but they really like to cuddle. While our cats typically hang out in the same room together, they rarely cuddle. Today, while I worked at home, they assumed a series of poses that came dangerously close to (though not quite) cuddling:

Now you know who we’re really rehabbing this house for!

The saga of the window coverings

April 6th, 2011

It’s interesting how a room comes together–and the little challenges you face along the way. Given that the upstairs of mad maison is petite (two bedrooms connected by a small landing/hallway that is also connected to the bathroom and the staircase), mike and I knew that we wanted to use the same color paint in both bedrooms to “tie them together” as they’d say on HGTV. Which means before we started stripping the wallpaper in mike’s office we knew what color the walls would be. And a few months ago, while looking for a chair we encountered a beautiful grey felt pendant lamp at Room & Board. It was a great deal (over 1/2 off the retail price), so we snatched it up even though we knew it would be months before it was installed. And before you can say “color splash” we had “selected” the primary colors for the room–the soft blue on the walls and grey (and then I decided we could throw some splashes of red in the mix). Given that we’d already chosen red window coverings in the living/dining rooms, we decided to go with grey window coverings in this room. In addition, we figured out that we’ll probably put a low console under the windows, so we knew that shades or blinds would be better than curtains. We also really like the clean and tailored look of minimal window coverings that show off as much of our beautiful window frames as possible. Never fear, I knew that ikea would serve us well. Two of my favorite shelter blogs have sung the praises of the ikea Enje roller shade, and I learned they produced a dark grey version of the shade. I mean, they really are perfect. We wouldn’t even have to cut them:

Ikea Enje Shade, dark grey

ikea delivers, again

Or not. As I start looking for a local ikea that has the shades in stock, I keep coming up short. There aren’t any in our two Bay Area ikeas. There aren’t any in Sacramento, or Southern California. I quickly realize they aren’t available anywhere in the US. So I email the good folks at ikea only to learn that they’ve been discontinued. Which is what can drive you crazy about a place like ikea–what could have possibly possessed them to get rid of a clearly popular item? Alas, we’ll never know. We’ll also never know why the shades are still available to our noble neighbors to the north but not us (I’m sure I could come up with a sarcastic political joke, but this is not that kind of blog). But I do know that I have some pretty immediate window covering needs. Any time we wanted to get dressed we needed to close the door to mike’s office. Direct sunlight left mike’s computer unusable due to glare for the better part of the day. My only recourse was the interwebs. I encourage all of our fearless readers to start looking online for grey roller shades that are between 24-25″ wide. Oh, and of course, please limit your search to coverings that will cost less than $50 a shade (which is still more than I wanted to spend). You’re not going to find much. From Target and jcp.com to the shade store and blinds galore. I finally found a shade I thought would work from my good friends at overstock.com:

Overstock.com Option

perfect, you would think

Alas, when we received the shades, here’s what it looked like:

Window Covering Misstep

not so perfect. notice the transparency feature!

Not only will you notice that the shade looks a lot more black than grey, but they aren’t that private either. . . so back they went. And back to door closing and computer screen glare. My partner was getting understandably frustrated. In a moment of weakness, he even did this:

Temporary Solution #1

glare can cause desperate acts

For those of you who know me well, you know that when I rarely admit defeat in such situations. My research continued. So one day I was browsing lowes.com and encountered a temporary, paper grey shade for only $9–that was in stock at my local store. And, it had a good review by a happy customer. My curiosity and my skepticism were definitely piqued. $9 seemed like a pretty safe gamble to me. So on the way home from work I picked up said shade, completed the quick and easy process of cutting it to size and Mike installed it. And here is the result:

Temporary Solution #2

our temporary fix that we want to keep

The color works well with our beautiful pendant light. The texture is a lovely. The light blockage is right where we want it–no glare, but continuing to let a little light in. mike is so happy he’s proposing they might work as a “permanent” solution to our window covering challenge. Even if that’s not the case, we now have a realistic solution that will work until we find another covering that we absolutely love–or we decide to take a trip to Canada.

another room bites the dust

March 23rd, 2011

The rumors that mike and I were buried under a pile of stripped wallpaper and spackle are not true. We’re alive and kicking, and continuing to improve our little abode room by room. I will admit that we dragged our feet on this latest room a little more than usual. You may ask why. I think it was a combination of factors, including the aforementioned home rehab fatigue, a new job for me, and other small projects we’ll share with you in upcoming posts. I think the biggest reason, however, is that we didn’t have to rush this room. Every other room we’ve worked on was a room that we spent time in or walked by every day–the living room, dining room, and our bedroom couldn’t be ignored (even when we wanted to ignore them). With Mike’s office, we made some adjustments that allowed us to close the door to the room when we weren’t actively working on it. We temporarily relocated Mike’s desk and all other essential furniture to our bedroom. On one level, it was lovely. But on another level it was definitely a procrastination-friendly setup. And while the room looks a little monastic right now (it’s the first time I’ve seen a room in person that didn’t have enough furniture in it), the walls don’t wiggle and the wallpaper is gone. We’re not done “designing” the room, but we are done rehabbing it and we think the results are pretty dramatic. Here’s one before shot (you can see others on our flickr site):

2nd bedroom before 4

Mike's office before

And here’s the same point of view yesterday:
2nd bedroom, post rehab

And for a little extra perspective, here’s what Mike’s office looked like back in New York:
2nd bedroom in nyc

We’re still trying to figure out what Mike’s going to do with all the extra space. Right now, Mike is thoroughly enjoying the echo. I promise, as we add more furniture and little things like window coverings we’ll happily share the results with you.

Mike and I are planning to work on our front hallway next–so we’ll be back to “in your face” rehabbing toot sweet

a quiet return

January 5th, 2011

mad is returning from a long hiatus with a short explanation and a follow-up on one of our little mad projects. The good news is that mad is still here, still in the maison d’etre (oh no, bad international puns), and still working. We’ve thought of our little blog and our faithful readers many times, but we simply fell off the mad maison wagon for a bit. Part of it was my employment situation–I (denise) left my job at one technology company and found a great job at another (better) technology company. In truth, however, that’s not the only reason. While I won’t say that mad stopped working on the house completely over the last few months, we definitely slowed down significantly. Call it a break, call it a little home repair burnout, mike and I needed to catch our breath for a bit. With a new year, of course, come new resolutions and new convictions. We’re back to repairing plaster, spackling, and working on our little projects.

As you may recall from this post, I wanted to make an old lamp I found in the house a little more mad. I’m happy to report that the project is complete (after spending a few too many months in our garage). It’s still old, it’s still funky, but it’s much more to our liking:

a little lamp project (after)

a little lamp project (after)

And for those of you who would like a reminder of what it looked like before:

a little project

my little lamp project (before)

Thanks to those of you who have patiently waited for our return; we plan to reward you in 2011 with more frequent posts about our ongoing adventures!

a mad rabbit hole. . .

July 14th, 2010

While we’ve made plenty of progress over the last year, our home is still very much in transition. As we’ve mentioned in previous posts, there are many items mad is waiting to unpack until our rehab efforts are complete. Thankfully, there’s a room in the garage (that was once my dad’s bedroom) that facilitates this storage.

Storage Room

The garage storage room that enables the mad approach

Sometimes, however, our approach can be a little frustrating (especially given our well known type a tendencies). The good news is that today’s rabbit hole was started for a good cause. I brought a few things back with me from my five years in New York. An appreciation for real seasons, a partner in life, and an affection for the New York Mets baseball team. My fandom was prompted in part by Mike (who loves all things baseball) but also by getting to know the Mets over a four-year period. I like that they’re scappy–even though they have a pretty high payroll. I like that they always act like a team (as opposed to a gathering of well-paid position players). I like that they’re the ancestors of the Dodgers and the Giants. I like the big apple in the top hat and the whole Met mascot family. And I like that they’re always the underdog due to another NY baseball team that we don’t need to name. I will even admit that I even like the way the Mets make you earn your fandom. Mike and I don’t have any animosity towards other baseball teams, but the Mets are menschkeit to us (especially with Isaac Benjamin Davis at first base and Howie Rose announcing the plays).

How does this relate to our storage room? The Mets are kicking off their west coast roadtrip this week. In honor of this, Mike and I decided to get some bleacher seats to see them at AT&T park here in SF. There really aren’t any bad seats at our local ballpark, and one of our best dates was going to see the Brooklyn Cyclones at Coney Island in the bleachers. Of course, to properly pay tribute to the Mets I wanted to bring my super-cool stadium seat cushion. And of course, this cushion was still packed away in one of our many boxes full of art in the storage room.

nym stadium seat

the cause of today's rabbit hole

Mike was kind enough to halt work on his office to locate the cushion. After a couple of hours, he found it–in the last box he looked in (why are these things always in the last box?). Of course, he found a few other items that we’ve agreed to take out of storage (towels and sheets)–and the room is neater and more organized than when he started. I showed my appreciation for Mike’s efforts by making him a homemade pizza while he was working away. Now both residents of mad maison are sated.

mad pizza

a little thank you from one member of mad maison to another

mad & spicy

July 12th, 2010

My culinary skills have been developing over the last 15 years (though they’re still very much a work in progress). I enjoy trying out new recipes, and Mike willingly beta tests my kitchen creations. While I did a healthy amount of cooking in New York, our small galley kitchen in Queens was a challenge. While it had new floors, cabinets, countertops, and appliances (as well as wonderful light), space was tight. Nowhere was this more evident that in the area of spice storage. The only place I could store my spices were in magnetic ikea spice containers above my stove. Any moderately spicy cook will tell you that was the worst place for them–spices last the longest when they’re stored in a cool, dark place. In addition, while the ikea containers were great when I wanted to use a measuring spoon, they were not ideal when I just wanted a dash or sprinkle of a given spice.

NY spices

my spice collection on display in Queens, NY

Our new kitchen, while in need of some cosmetic help, is much more usable. It’s larger, with significantly more counter and cabinet space. I have an entire shelf in one of those many cabinets devoted to storing my spices (yes, I did replace them when I moved across country). Since the kitchen is so much easier to cook in (I can use my slow cooker and food processor at the same time), I’ve been using my spices quite a bit. Because they’re tucked in a cabinet I’ve kept them in the original jars. Over the last year, I’ve gotten more and more frustrated with the standard grocery store spice jar. I realized I wanted a spice jar that I could quickly use whether I wanted to sprinkle, pour, or measure a spice. I learned that the few jars I kept from my old NY grocery delivery service, Fresh Direct, were perfect.

IMG_0486

My perfect Fresh Direct spice jar next to an ersatz jar

Of course, Fresh Direct doesn’t deliver to San Francisco, and they aren’t able to ship spice jars to me either. I checked out the spice jars at ikea, and none of them met all my needs. The Rationell jars had the functionality I wanted, but too much plastic. The Droppar jars looked great, but the functionality was lacking. The 365 jars had all the function I was looking for, but I knew the tapered shape would prove frustrating after a while. I was starting to feel like the Goldilocks of spice storage.
ikea jars

Thankfully, while picking up a dough blender at Bed, Bath, and Beyond, I found the perfect spice jar. It’s primarily glass, with a chrome and plastic top that provides me with all the functionality I was looking for. Online they don’t sell the jar on its own (only in those giant spice racks), but I found in the store the price was comparable to the ikea jars. I printed up labels and transferred my spices to their new home.

IMG_0478

spices, before

IMG_0495

spices, after

And for those of you who are curious, no, they aren’t organized alphabetically. I use my oregano a lot more than my cumin.

mad bling

July 5th, 2010

Back in February mad shared our project to add a vanity area to our bedroom for me. After a few months, I realized there was a component missing. As part of my DIY streak I have quite a few necklaces. I wanted to find a way to store them that would discourage tangling and make it easy to incorporate them into my morning routine. Previously, I stored my necklaces in a hacked wooden medicine cabinet–but having them behind a door in a cabinet that was a little too “country” for my evolving tastes wouldn’t work in mad maison. I had seen numerous open displays of jewelry that I thought worked well, but none of those displays supported the number of necklaces I have. I also wanted something that could “tuck away” to avoid tempting the cats from turning my creativity into a cat toy. After a little bit of research I realized a towel holder might do the trick. I found one at ikea that had clean lines and a little upturn to keep the necklaces on the holder. Mike and I installed it on the wardrobe we have in the bedroom. I absolutely love it–my necklaces are readily available but not in the way.

jewelry storage

my new necklace storage, with Max's approving gaze

You might be surprised to see my necklaces organized by type and color (if you’ve forgotten that I built a database for our cross-country move). Mike wasn’t surprised at all.

jewelry storage 2

my necklaces in action

mad 1, wallpaper 0

July 2nd, 2010

mad is celebrating this fourth of July weekend by continuing to assert our independence from wallpaper. The optimism displayed in my previous post was validated today when mad removed all of the remaining wallpaper from Mike’s office walls. Using both DIF and our power steamer, we were able to eradicate all of the wallpaper in a few hours.

Removing Wallpaper from Mike's Office

Mike persevering over wallpaper thanks to DIF and our Power Steamer

Of course, removing the wallpaper is the first of many steps in rehabbing a room mad style. We now have to wash the walls with TSP, and of course, complete the ever-important plaster repair. We’re trying something a little new at mad maison and sharing a short video of our old plaster walls that wiggle off the lathe:

mad’s taking a much-deserved couple of days off to enjoy the holiday weekend, but we’ll be back next week with plaster repair, spackling, priming, and painting.

a little mad project

July 1st, 2010

Mike and I have started to make great progress on our second bedroom (which serves as Mike’s office). The room was being used even though it was in quite a state, so the first thing we had to do was move out of it. We’ve temporarily relocated Mike’s desk and miscellany to our bedroom, and all the items that we were “storing” in his office have been moved to various undisclosed locations. This room is exciting for a few reasons:

1. We removed about half of the wallpaper “dry” (without DIF or steam) right after we moved in.
2. There is only one layer of wallpaper on the walls.
3. We don’t need to “live” in the room while we work in it.

All of this allows for a cleaner and smoother room rehab that we’ll be reporting on in future mad maison postings. In the meanwhile, I thought I would share another little project I’ve taken on myself. This was another mad garage find that I’m going to try to turn into something we’ll use and enjoy. I’m going to try to improve a lamp that belonged to my grandparents with some gumption and spray paint. This lamp caught my eye for a few reasons–it doesn’t have any flowers on it (which is unusual for my grandparents belongings) and I like the “two-tier” effect of the lampshade. I will share after pictures when I’ve completed the project. I do recognize that it’s a little odd that I’ve taken on smaller “hobby” projects to distract me from my huge renovation “hobby.” My commitment to mad maison is that profound.

a little project

my little lamp project (before)

the mad kitchen

June 20th, 2010

This weekend mad took a break from scraping, painting, staining, sanding, and the like. Instead, we put our energies into the fun enterprise of making Fathers’ Day cupcakes for my dad. While I have fully embraced the DIY attitude of my generation with plenty of crafty hobbies (that would include knitting, making jewelry, cooking, and of course, home improvement), my dad does not have a lot of hobbies. He doesn’t make models, golf, sail boats, or play chess. He also doesn’t have a strong hankering for geeky toys like I do. mad was challenged, therefore, to find an appropriate Fathers’ day gift that he would use and appreciate. He does  occasionally like a snack, with a sweet tooth that leans more to the carrot cake and key lime pie end of the spectrum. However, he’s also been on a bit of a health kick for the last few years, eschewing refined sugar, flour, and excessive starch. I decided, therefore, to use our very functional (though still less than attractive) kitchen to make him carrot cake cupcakes that would jive with his clean living attitude. The cupcakes are sugar free, reduced fat, and contain organic whole wheat flour and organic shredded carrots. Despite my DIY nature, I’ve never been a baker, so I baked test batches of a few different carrot cupcake recipes. My brother came over last week to help beta test the batches (as well as help Mike carry our newly refinished furniture up to the dining room). We all unanimously picked the recipe that I used for tomorrow. Mike provided critical sous-baking and cleanup skills to the endeavor. I’m hopeful that my dad will enjoy and appreciate the surprise. Interestingly, he isn’t a faithful reader of mad maison (he delegates that to my mom), so this blog post shouldn’t spoil the surprise for him. You’ll also notice we’ve created a new category (the mad kitchen) for us to share future culinary hi-jinks with you.

Fathers' Day cupcakes

mad's Fathers' Day Carrot Cake Cupcakes

Old piece, new life

June 12th, 2010

As I mentioned last week, mad has a couple of final touches for the dining room, including the refinishing of my grandmother’s buffet cabinet and dining room chairs. This week, we decided to tackle refinishing the dining room cabinet, and we’re quite pleased with the results.

Dining Room Before

a reminder of what the buffet looked like before

I have to give credit to a blog I read regularly, young house love. John and Sherry at yhl wrote about their experience refinishing a mid 20th century dresser for their new daughter’s room. I was shocked to learn that it is possible to refinish a veneered piece of furniture, as long as the piece is well constructed. I knew the overall look of my grandmother’s piece would work well with our style, but I assumed I was stuck with the color, which honestly doesn’t quite go with the rest of our dark wood pieces. After sanding a discreet test area, I knew we were in business. The hardest part of the sanding process was working through the veneer and sanding the doors, which have plenty of nooks and crannies. We gave up our garage parking spot for the week and used one of minwax’s stain/poly products. We completed three full coats of stain to get a color that would work for us.

buffet after

the cabinet after the mad treatment, with Max's approving gaze

It’s the very first time we’ve refinished any piece of wood, and overall, we’re very pleased with the results. You’ll see the color works pretty well with our dining room table. We’re also happy with the new hardware we used that matches the pulls and knobs on the built-in dish cabinet. I often read about fellow bloggers who buy flea market and cragislist pieces and breathe new life into them. I now understand how they feel–amplified by the fact that it’s my grandmother’s piece (so it has a personal history and no cost). The final cherry on top is that we have a little more room in the garage. Of course, it also means its really time to move on to Mike’s office.

back with a bang

May 30th, 2010

Our apologies, loyal readers–mad took a little unexpected break from blogging. We’re happy to announce we’re back with gusto–and with a new room to show you. For while we weren’t blogging about it, we were throwing a healthy amount of energy into completing the rehab on our dining room. While mad would never say that rehabbing any of these rooms is easy, we will admit this room was less frustrating than our bedroom. Removing the three layers of wallpaper was easier because it didn’t cover the entire wall (thanks to the wainscoting), and because for some mysterious reason it wasn’t infused with the wall itself (we think the house was giving us a break). In addition, the challenge of painting the wainscoting was actually pretty straightforward. The room has already been put to good use–both as a dining room and Denise’s office. We’re particularly proud of the built in cabinet–not only did we paint it, but we replaced the door hardware from strange plastic wanna-be art deco hardware to a straightforward black hardware. Feel free to check out the full collection of dining room before and after shots on our flickr site.

In the coming days/weeks we’re going to get started on our guest bedroom (which is also Mike’s office), so we’ll have plenty to share with you. In addition, we still have some remaining tasks for the dining room (refinishing my grandmother’s old buffet cabinet and reupholstering her dining room chairs), so the house work is far from over. In the meanwhile, thanks for enduring our blog break and for sticking with us.

Dining Room Before

The dining room before we moved in

Dining Room After

The dining room after the mad treatment

DR after 4

Before and after of the built-in cabinet in the dining room

Welcome, Shlomo

March 29th, 2010
shlomo

A photo of a Northern Mockingbird, and one of Shlomo's mishpocheh (brethren)

Last week activity at mad maison slowed a little because I was on a business trip to Plano, Texas. While I could write an entire post (perhaps even a few) about the differences between the Greater Dallas area and the Greater San Francisco Bay Area (and why I’m grateful to live in the latter), today’s post is about the new neighbor who greeted me upon my return to mad maison. Our new neighbor didn’t announce himself until after night fell. Once it was dark, he sang his song all night long. Yes, loyal mad maison readers, Shlomo (which is Hebrew for peaceful) is a bird (and yes, irony was present when we named him). After a little bit of research it was clear that Shlomo is a Northern Mockingbird. It seems that when male mockingbirds are without a mate, they sing throughout the night to attract one. While Shlomo hasn’t prevented the residents of mad maison (human or feline) from falling asleep, it’s our hope that he finds a date soon. Of course, Shlomo is one of those small reminders of the differences between New York and the Bay Area. For all of the articles I read about the Peregrine Falcons in Manhattan, I didn’t see many non-pigeon birds in New York City. And of course, avian sightings were even less likely before April or May. But here in temperate San Francisco, with plenty of hills and trees for friends of the forest to make themselves home, Shlomo is welcome.