Archive for the ‘bedroom’ Category

fool me once. . .

Tuesday, July 12th, 2011

When you rehab every room in a house there are always small, lingering tasks. They don’t prevent you from using the room, but you know the room isn’t quite ready for prime time (or a blog post). Here at mad maison we have more than a few. Sometimes, completing those tasks can be more fulfilling than all the other work you put into a room. Recent examples are the ceiling fixtures in both our bedroom and mike’s office. You may be surprised to learn that mad wanted to replace the identical light fixtures in the two bedrooms:

Mike's Ceiling Fixture, before

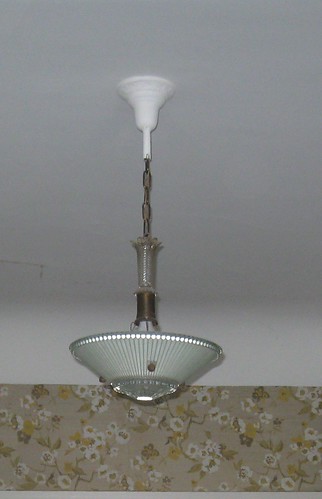
original bedroom fixtures

Perhaps you recall from a much earlier mad maison post, we were almost undone by the wiring in the living and dining rooms. In the bedrooms, we delayed replacing the lights until we found fixtures we loved and a better method. Once we found the fixture for mike’s office from Room & Board, I knew I would use a similar simple pendant/drum shade fixture in our bedroom. The night we purchased the light, as I was laying in bed looking at the old fixture, I remembered something Bob (the Room & Board salesperson) said about the wiring: “you could easily replace the housing unit for very little money with one that’s suitable for your house.” You see, the tops of the living room, dining room, and both bedroom lights all looked like this:

Dining Room Light, before

original dining room fixture

As you can see, there is a canopy (that sits against the ceiling), a rod that screws into the hickey (I swear, that‘s the name), a chain attached to the rod, and then the rest of the fixture. As I looked at the fixture still hanging in our bedroom, I realized I could probably cut the chain, reuse the rod and the canopy, spray-paint them (someone had painted the top of the fixture in the dining room), and then string our new pendants through them and install them quickly and easily. So that’s exactly what we did. I’m thrilled with the results. The pendants are very secure (especially since they’re much lighter than the earlier chandeliers) and I prefer the look of the white canopy on white ceiling to the chrome on white we currently have in the dining room and living room. And, the design works better with this 103 year-old house. See for yourself:

Mike's office Ceiling LIght

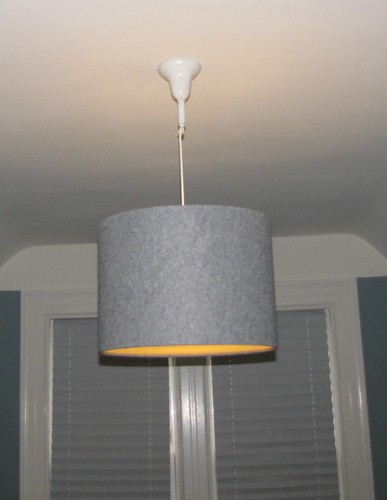
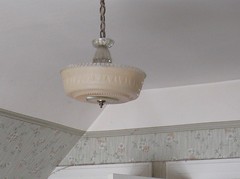
new ceiling fixture in mike's office

Bedroom Ceiling Light

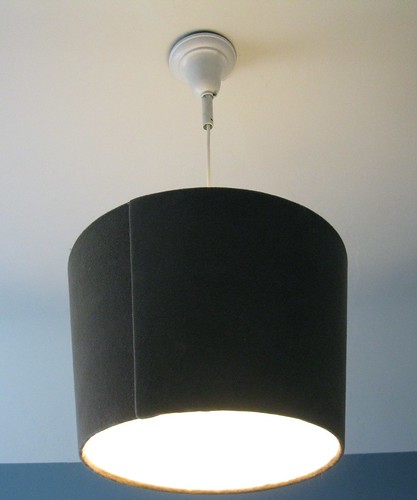
new bedroom ceiling fixture

In fact, when we’re done with everything else in the house, and I’m able to find suitable canopies and rods for the living room and dining room, I might even rewire our current pendants in those two rooms. Of course, that won’t happen for quite some time. We have many other small tasks (like our kitchen, bathroom, and hallway) to finish first. Perhaps most satisfying of all is the realization  that we’re actually getting smarter and learning from our mistakes. Our house may be able to fool us once, but not twice.

mad bling

Monday, July 5th, 2010

Back in February mad shared our project to add a vanity area to our bedroom for me. After a few months, I realized there was a component missing. As part of my DIY streak I have quite a few necklaces. I wanted to find a way to store them that would discourage tangling and make it easy to incorporate them into my morning routine. Previously, I stored my necklaces in a hacked wooden medicine cabinet–but having them behind a door in a cabinet that was a little too “country” for my evolving tastes wouldn’t work in mad maison. I had seen numerous open displays of jewelry that I thought worked well, but none of those displays supported the number of necklaces I have. I also wanted something that could “tuck away” to avoid tempting the cats from turning my creativity into a cat toy. After a little bit of research I realized a towel holder might do the trick. I found one at ikea that had clean lines and a little upturn to keep the necklaces on the holder. Mike and I installed it on the wardrobe we have in the bedroom. I absolutely love it–my necklaces are readily available but not in the way.

jewelry storage

my new necklace storage, with Max's approving gaze

You might be surprised to see my necklaces organized by type and color (if you’ve forgotten that I built a database for our cross-country move). Mike wasn’t surprised at all.

jewelry storage 2

my necklaces in action

another little thing. . .

Wednesday, March 10th, 2010

Even after we rehab every room, mad maison is only 1,080 square feet (excluding the garage). While many people would consider that a small space, it’s actually a bit larger than our apartment back in Queens–and it’s plenty of space for mad. Like many older spaces, however, it is a little lacking in closet space. Our house only has two closets (one in each bedroom), which is half the number of closets we had in Queens. It’s important, therefore, that we take full advantage of each of them.  The closet in our bedroom is actually more spacious than we expected, with an alcove that fits a little dresser. Of course, despite its size, there is no light in the closet. While our longer term plan is to have an electrician wire the closet with light, that’s not in the cards for phase one of mad maison rehab. I was determined to come up with an interim improvement that didn’t involve me holding a flashlight with my teeth as I try to find my clothes. Do you ever get one of those catalogs of various home improvement gadgets wondering if you’d ever use them? Well, your good friends at mad maison can attest that at least one of those gadgets comes in handy–the motion sensor battery-powered light. It was easy to install, and by using a couple of them I actually have decent visibility of every nook and cranny of the closet. Here at mad maison we call that a win.

closet light

A little home improvement that helps a lot.

a little vanity project

Sunday, February 21st, 2010

I’ve never understood folks who like to style their hair and put on their makeup in the bathroom (the most humid room in the house). Because I share our one full bathroom with Mike (and I like a steamless room to complete my morning ritual) I wanted to create a little area in our new bedroom where I could put on makeup and style my hair. I took a little inspiration from a recent blog post from Anna at door sixteen and painted an Ikea BEKVÄM step stool in colors that match the bedroom. The step stool also functions as a nice little seat. We then installed a simple shelf and a mirror. I rounded out the project with some inexpensive painted boxes to store glasses and makeup that was inspired by a $100 storage shelf from CB2. I’m very pleased with the results, and I think it will be a very functional area for me to use every day.

Inspiration thanks to doorsixteen, ikea, and cb2

The completed vanity project. Simple and functional.

Bedroom before and after

Thursday, January 28th, 2010

mad has been happily sleeping in our new bedroom for almost a month. We’re still in the process of “settling in” to the room–unpacking any remaining boxes of stuff that belong there–but it’s been absolutely wonderful to have such a restorative place to retire to every night. I wanted to share before and after pictures of the room. The before picture was while my pops was still clearing the house out (mad was in NY when the before picture was taken). We won’t be displaying any of our art until the whole house is done (rehab dust finds its way everywhere), but the furniture is in place and (most important), the walls are done.

Here's a before shot of our bedroom, while my pops was working away.

Our newly completed bedroom. It's unusual to have both cats pose for a picture.

Bedroom progress

Wednesday, January 6th, 2010

I’m happy to report that we completed the walls of our bedroom and we’ve started the process of cleaning the floors, moving our furniture in, and hanging window coverings. We’re not fully assembled yet, but I wanted to share the different between our walls before we painted and after. I’m excited to move in and share more pictures with our faithful readers.

The bedroom walls sans wallpaper, post plaster repair, ready for primer.

Our new bedroom walls

desperate mad innovations

Wednesday, December 30th, 2009

We’ve mentioned before the essential role that Big Wally’s plaster repair has played in the rehab of both our Living Room, what will be our bedroom, and we expect every other room of the house. Big Wally’s reattaches the plaster walls to the wooden lathe that sit behind it. When mad used Big Wally’s in the living room, we came very close to running out of the precious caulk. Therefore, I ordered twice the amount of caulk for the bedroom. Unfortunately, the walls in the bedroom were in worse shape than the living room. And with about 12 holes that still required caulk, we ran out. You can only buy Big Wally’s on the internet, so mad needed to implement some combat tactics in order to stay on schedule. As documented before, mad performs well under pressure. Using a chopstick and a pair of scissors we were able to squeeze those last few drops of caulk out of every tube. Thankfully, it was just enough to fill those remaining 12 holes. Most important, it kept the final week of the bedroom rehab work on track.

Completed bedroom plaster repair thanks to scissors, chopsticks, and guile.

sometimes you eat the bar . . .

Monday, December 28th, 2009

and, as the dude would say, sometimes the bar eats you. While it’s been a struggle, mad continues to make progress towards completing the rehab on what will be our primary bedroom. Our goal is to have the bedroom complete around the first of January, which means the clock is ticking. In case you’re new to mad maison, or our living room rehab feels like a distant memory, the steps for being “primer ready” are extensive:

1. Remove crazy-glued, band-aid brand wallpaper that was hidden under layers of paint. Remember to employ water, steam, DIF spray, and anything else you can think of to get the wallpaper off. Curse occasionally when a piece of wall accompanies the wallpaper. Sacrifice at least one outfit to the wallpaper removal deities and tell yourself you still have three rooms and a hallway to go (and with them, plenty of opportunities to wear this crusty ensemble).
2. Identify all of the cracks in the walls of the room and determine how many of those cracks represent the walls coming of the lathe. Grumble when you realize it’s most of the cracks. Stare in wonder at the crack that goes up one wall, across the ceiling, and down the other wall.
3. Drill holes in the wall in preparation for the Big Wally’s treatment. Remember to get out all destructive feelings during the drilling.
4. Complete the Big Wally’s repair process by spraying conditioner and then caulk into the holes you just created (yes, even upside-down on the ceiling). Screw in temporary clamps to ensure the Big Wally treatment does it’s job. Wait 24 hours.
5. Slather copious amounts of joint compound/patching plaster over every hole, gouge, crack, and crevice in the walls (yes, even upside-down on the ceiling). Wait 24 hours.
6. Sand the walls as smooth as possible without removing all the joint compound you just applied.
7. Apply two coats of primer–the first primer these walls will see in their 101 years on this planet.
8. Apply two coats of paint.

This room should have been easier than the living room. It’s smaller, the ceilings are lower, and there was no mantle to remove. Alas, this was not the case. The wallpaper was beyond comprehension and underneath that wallpaper the walls were in much worse shape. Despite this, mad endures. We’ve completed all plaster repair and we’ll have finished all the joint compound application before we head to bed tonight. I’m taking off this week from work so we can achieve our goal. Our plan is to sand tomorrow and prime on Wednesday. Painting, which Mike used to hate more than anything, will be our favorite part of the process.

I read a lot of “shelter” and home design blogs when I’m not working or working on mad maison (feel free to check out Apartment Therapy’s 2009 Homies feature to see the variety of blogs out there). When I lived in New York, these were a fun distraction that provided the occasional inspiration for a small tweak to our perfect (in our eyes) home. Now, they inspire me to action and, I will admit, occasionally make me feel a little slow and inadequate. But then I remind myself that Mike and I signed up for the entire journey together, not just the destination. I remember that I live in one of the best cities on earth where I get to enjoy not only the history of this 101 year-old building but the family history that comes with living in the house my Dad grew up in. I remind myself that all of this home rehab work will be well worth it when it’s done. I remind myself that we’ll be living in chaos for only a fraction of the time we’ll be living in this house. And I look out the window of what will be our beautiful bedroom, past the rooftops of those uniquely San Franciscan homes and at the peak of the Bay we get to see and remind myself that this is all well worth it.

We at mad maison definitely have more in common with the tortoise than the hare. Finishing will be all the 'win' we need. Photo courtesy of thecolor.com